Tuesday, November 11, 2014

Toasted Hazelnut Chocolate Milk and Chocolate Hazelnut Balls

  It's the most wonderful time of year! Fall colors, crisp air and football!  Only I live in the bay area and, though it is now October, it is over 88 degrees and our summer is finally here. How am I supposed to enjoy my long awaited summer, when I am dying for it to be fall? It's the same thing with Christmas... it is still warm and sunny when christmas carols are playing on the radio and I am trying to get names crossed off my gift lists. As a transplanted Washingtonian, it's been hard for me to adjust to the holiday season with these fall and winter temperatures. The only way I can satisfy my longing for fall is through food these days!  Miso Delicata Squash Salad for dinner and Toasted Hazelnut Chocolate Milk for dessert!  

As I have said, I like fast, easy and foolproof recipes... this one started out that way, but ended up requiring some improvising on my part after things went wrong. My recipe is taken from Smitten Kitchen and the adaption only takes place in the technique... but you will see below... it got messy, but then yummy... so keep reading! 

Ingredients


2 Cups of Hazelnuts
1 /14 Cups of Semisweet or bittersweet chocolate chips (I ended up using bittersweet)
3 1/2 Cups of Water, plus more for soaking


Note: The hazelnuts need to soak in a bowl of water overnight
Cheat Note: I bought toasted hazelnuts so that I could skip that step. I have no idea if that takes away from the intensity of the flavor.

If you are like me, and can't seem to toast nuts without burning them every time, then buy the ones that are pre toasted and skip to the next step. If you are toasting your own hazelnuts, then heat your oven to 350 degrees. Cook the nuts for roughly 15 minuets, turning them a couple times so they don't burn (See, theoretically, I know how to not burn them, but I have a very short attention span). They will have a light golden brown color when they are done. 

After you have soaked the hazelnuts overnight, rinse them off in a strainer and transfer them to your blender or food processor. 


A blender is better if you have a strong one because you need to add quite a bit of water. 


 Blend, then if you have cheesecloth, lay it over a bowl and let the liquid strain through into a bow… I used a lint free drying towel. 


You may have to stir the ground up hazelnuts around to get all the liquid to soak through


Squeeze out as much of the milk as you can


Now you have the milk… you just need to add the chocolate!


Melt the chocolate either over a stove like I did here or in the microwave… I find that the stove is much better because it is harder to overcook the chocolate. To do this method, heat water in a pot, place a bowl with the chocolate on top of the pot and stir constantly. Make sure that the bowl of chocolate doesn't touch the water below. 


Remove the bowl of melted chocolate from the pot once almost all of the chocolate chunks have melted. This will keep it from overcooking. Continue to stir the chocolate until it has all melted. All good? Great! Next is the tricky part, the part I completely failed and I don't know why, but here is what Smitten says to do…

"Add the milk, 1 teaspoon at a time to the chocolate and stir it in".  I did this and my chocolate began hardening after about 3 teaspoons, so something went wrong, somewhere...


No one was going to be able to drink that…


Remember me saying I like easy, fool-proof recipes?  Frustrated, I tried again, with the bittersweet chocolate this time… and the same results… grrrr… I wanted hazelnut chocolate milk and now what I had was hazelnut milk and two large balls of chocolate… not bad, but not what I was going for.


THEN inspiration hit and I threw the milk and the bittersweet ball into the blender!


Desired results achieved!!! And let me say, it is fabulous in coffee!  Side note: it hardens in the refrigerator to the consistency of pudding… melts easily in coffee or is great over ice cream! 

 I was then left with the conundrum of what to do with the extra chocolate ball. Obviously I couldn't throw it away...


Hazelnut coated chocolate balls? Why not?  


I spread the hazelnut meat out on parchment paper and stuck it in the oven at 200 to dry it. I don't remember how long this took because I was just winging it. Probably 20 min, but I stirred it frequently and checked it very often (remember... I burn nuts). While they were drying, I rolled the chocolate into balls and melted a small bowl of butter.  Once the hazelnut pieces were dry and cooled off (you don't want to melt your chocolate balls),  I dunked the chocolate balls into the butter and rolled them in the hazelnuts. You can then sprinkle with powdered sugar… if you definitely want diabetes… 

Fall Finally

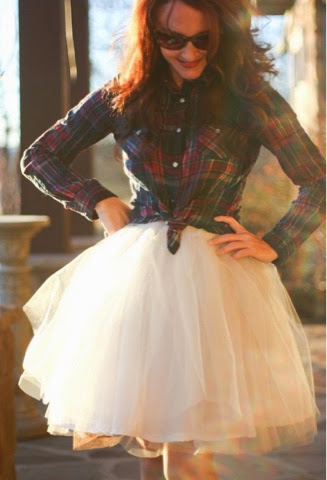
Not sure about where y'all live but here in Cali, it's been summer for a very long time… not that I should be complain about sunshine and 75 degree weather in November, but I love fall!  The beautiful leaves, crisp air and …. the fall cloths!  And this year, I have a new obsession!  Tulle!  Tulle skirts to be exact!  For me and my mini!

The warm weather isn't hindering me from wearing said new obsession, I was just dying of heat in my button down, but I couldn't hold off… isn't this skirt amazing? Modern day ballerina anyone?


 I mean seriously, how cute is she?


Yes, I know, she is without her usual bow, but she wasn't having any of it today.


I found this great fashion Instagrammer, liketoknow.it. Y'all are probably already following them, but I love how simply "liking" their pictures gets you an email with direct links to the cloths. Makes it so easy to shop for new things, especially if you are like me, and wanting to shake up your wardrobe this season. 


I actually found this skirt via a pin on Pinterest. One of my friends linked this skirt from Anthropologie, but it was sold out!  After some research, I found the designer and ordered it direct!  It comes in various shades and lengths.

I think Baby J loves it too!

My Skirt by Alexandra Grecco
My Chambray Shirt
Seychelle Shoes are old, Similar Here
J's Chambray Shirt
J's skirt I found second hand, similar Here
J's shoes are also second hand, similar Here

The thing I love about these tulle skirts, are the many fabulous ways they can be worn. From t-shirts to chambray or flannel! Heels or flats! Dressed down, or dressed up.  Below are pictures borrowed from the internet. I, in no way, own any part of these photos…hopefully, that is enough to keep me out of any legal problems due to reposting these pictures.


Happy Fall!  

Sunday, September 14, 2014

My Baby Turns One


 I know everyone says it, but it's hard to believe she is already a year, but if any of you have your own children, you know what I mean.... How did I keep her alive for a whole year???


Custom bloomers from Breezy Oaks Designs

It has been the best and the hardest year of my life. There is nothing like having your own child to show you how much love you are capable of or how much patience, or lack there of, you can have for one needy little person. 


This past year I have never been so busy physically but at the same time, struggling mentally for things to challenge me. Since leaving my job as a Telemetry Nurse in a level II trauma hospital to be a Stay-At-Home-Momma, I have been fighting to find the balance between the independent me and my new role. Getting crafty, planning trips and parties, and filling our home with tons of out-of-town guests has been filling up my schedule.


 Tissue Paper Pom Poms by Dress My Cupcake 

 The weekend of Jemma's birthday was also the weekend that I co-hosted my baby sister's bridal shower. It was also the weekend that she moved into our guest room to live until her wedding at the end of September. I wasn't even sure if I was going to get to do a birthday party for Jemma with all the chaos. 

 Burlap banner from Amazon hand painted with acrylic white paint

My in-laws were arriving the following weekend and since Jemma had no idea that she had turned one, I decided to have a small, belated party... because let's face it, the party isn't for the kid, it's so that I can take all these fun photos!  

Cupcake flags made from Washi tape and toothpicks


All I can say is that I am extremely lucky for a tolerant husband who loves to help me host, for my wonderful friend Mary, my sister, and my in-laws who helped in countless ways.


Big balloon from Hobby Lobby


 My sweet little girl loves her bubbles 


Having a toddler opens your eyes to things we take for granted. Sugary foods for one. Jed and I committed to not giving Jemma any processed sugar until her first birthday, in hopes that she would be a good eater of healthy things. Since we have, thus far, only had one test subject, it seems a bit premature to say that our theory played out as we predicted since Jemma eats basically anything and lots of it.


We held strong until Jemma was 11 months old and we visited Oahu. Jed and I love Hawaiian shaved ice and couldn't keep it from little Jemma's grabby little hands. 


  Kisses for daddy

I have been dying to get Jemma working with paint! Though I knew she was probably a little too young, I thought it would be fun for her and the other babies to get messy.... Turns out, paint doesn't taste like frosting, even though it looks like frosting, and that doesn't make it as fun.... at first. 

Yucky paint


Really getting into it
  
Artwork by one year olds 


We realized afterword that we had forgotten Jemma's birthday hat!


It didn't last long anyways!


As always, I have a DIY to share. I made Jemma's birthday onesie that you see her wearing in the pictures above. The pictures below were taken on my iPhone and the clarity and colors aren't very good but here are the steps.

I used onesie that she already owned that had cute stitching around the collar and a little strawberry on the chest. Using a charcoal pencil to do a rough sketch, I drew a cupcake and the number one. Tip: Charcoal pencils work great because they leave a mark even when you press really lightly, making drawing easier, plus it comes off easily in the wash.


Next, using fabric medium paints, I made an outline of my picture, then fill it in.


Lastly, just add little details 


All that needs to be done now is to heat set the picture so that the colors stay and don't fade when they are washed. I explain the process of heat setting on my 4th of July Post. 


Have a wonderful week!